
What is Kaltura?
Kaltura lets you create and share an unlimited amount of video and audio recordings in Canvas. Uploaded files are automatically converted into multiple formats for a seamless viewing experience. No plugins or special software is required to view videos, and you can easily insert them into course sites or even the web.
What files can I use with Kaltura?
Kaltura accepts a wide variety of audio, video, and image file types, and does not have an upper limit on the file size of media you can upload. Here is a list of some of the more common file types that Kaltura can process:
- 3gp -- Multimedia Mobile Format
- asf -- Microsoft Media
- avi -- Audio Video Interleave
- flv -- Flash Video/Audio
- mov -- Apple Quicktime
- mp3/mpeg3 -- Moving Picture Experts Program Audio Layer 3
- mp4 -- Digital Video Format
- mpg -- Digital Media Format
- qt -- Apple Quicktime (old format)
- rm -- Real Media
- wav -- Waveform Audio File Format
- wma -- Windows Media Audio
- wmv -- Windows Media Video
How do I get media into Kaltura?
You can create new media in several ways via the Add New menu on the My Media page from within Kaltura.
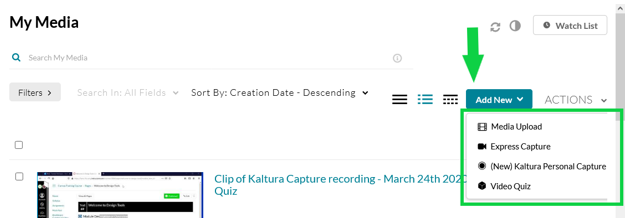
- Media Upload: Click Add New > Media Upload and choose an existing local media file to upload. Enter metadata information about the media and click Save.
- Express Capture: Click Add New > Express Capture to use Kaltura Express Capture, which is a pared-down, quick-recording option. It allows you to record video directly within your Internet browser using your webcam and microphone. After recording and saving your video, it will be uploaded into your My Media page. In short, this is a "click and shoot" simplified option for creating video. More information is available at Kaltura Express Capture.
- Kaltura Personal Capture: Click Add New > Kaltura Personal Capture. If the Kaltura Capture software is not loaded on your computer, you will be prompted to download it. For details about using this software, please see our documentation for Kaltura Personal Capture.
- Video Quiz: Click Add New > Video Quiz to add quiz questions to an existing video. You can select a video already in your My Media collection, or upload a new one.
Once your media has been uploaded/created, enter metadata information about the media as prompted, and click Save.
(Note that you may, in some cases, see additional options when you click Add New.)
What is “metadata”? What do I need to enter?
“Metadata” refers to the information ABOUT the data, in this case, information about the media content you are adding.
Kaltura requires that you give the media file a name; this should be a short, descriptive title, as it is what others will see.
You may also enter a longer Description, and search Tags.
You can mark a media file as Private – visible to its owner (you) only – or you may mark it Published so that it is visible to others. Of course, you can always change this status later.
Where will the media appear?
My Media
My Media is a place where you can upload personal video, audio, and even picture files that will move with your account no matter what course you are in and is unique to your account, it is not viewable to anyone else other than yourself.
Course Media
Course Media is a place where you can upload files for a specific course and make it available to all students within the course to view; this can be used by instructor and all students within the course. The teacher, meaning they only post to the Gallery after teacher approval, moderates student videos.
Media Gallery
The Media Gallery contains all media published by any member of the course. The course instructor can moderate content and view usage statistics using the Action menu.
Now that I have added media files, how can I use them?
Add My Media content anywhere in Canvas where you can access the Rich Content Editor (RCE). In the Canvas RCE there is a button (see image below) that allows you to do so. Click the Kaltura button in the RCE to record directly from your webcam, screencast anywhere on your computer, or upload audio or video files:

A Note about Canvas's Built-in Upload Media Tool
Canvas has an awesome, built-in Upload Media tool that both you and your students can use. In fact, it's a superior workflow for managing student video assignments. But, there are several reasons why instructors may wish to stick with Kaltura for lecture content or other instructional recordings:
- Kaltura allows up to 2gb upload file size, but Canvas only allows up to 500mb (1/4 the size).
- Kaltura automatically captions your videos at a 75% accuracy level; you have to add captions on your own with Canvas.
- Kaltura streams to viewers' devices based on their screen size and internet connection; Canvas only renders the version you uploaded.
- Kaltura allows you to record from your screen and webcam; Canvas only lets you record from your webcam or voice.
Kaltura Accessibility Statement
Kaltura Privacy Policy
For more information, view the complete list of Kaltura articles from the FSU Office of Distance Learning